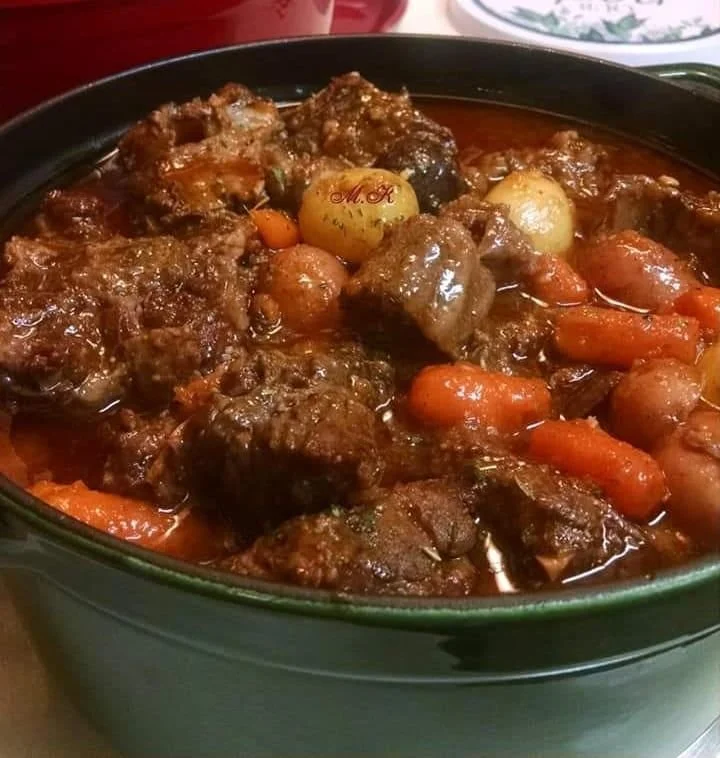
Tag: comfort food

  • Goulash

    Goulash

    Goulash

    Goulash is more than just a meal; it’s a hearty, warming dish that tells a story of comfort and tradition. This popular stew, originating from Hungary, is perfect for sharing with family and friends. In this article, we will explore how to make the ultimate goulash recipe, packed with rich flavors that will have everyone asking for seconds!

    A Hearty Dish for Every Occasion

    Goulash is a versatile dish that can be served on cold winter nights or at family gatherings. Its rich flavors come from tender beef, savory vegetables, and a blend of spices that create a comforting bowl of delight. Whether you’re a seasoned chef or a cooking novice, this recipe is designed to be straightforward and delicious!

    🧂 Ingredients:

    • 2 lbs beef chuck, cut into cubes
    • 2 tablespoons vegetable oil
    • 2 onions, chopped
    • 3 cloves garlic, minced
    • 2 tablespoons paprika
    • 1 teaspoon caraway seeds
    • 4 cups beef broth
    • 1 can (14.5 oz) diced tomatoes
    • 2 bell peppers, chopped
    • 2 carrots, sliced
    • Salt and pepper to taste
    • Fresh parsley for garnish

    👩‍🍳 Directions:
    1️⃣ Sear the Beef: In a large pot, heat the vegetable oil over medium-high heat. Add the beef cubes and season with salt and pepper. Sear the beef until it’s browned on all sides (about 5-7 minutes).

    2️⃣ Add Aromatics: Once the meat is browned, add the chopped onions and minced garlic to the pot. Sauté for about 3-5 minutes until the onions are translucent.

    3️⃣ Incorporate Spices: Sprinkle the paprika and caraway seeds over the meat and onion mixture. Stir well to combine, allowing the spices to toast for about 1-2 minutes.

    4️⃣ Pour in the Broth: Carefully add the beef broth and canned diced tomatoes to the pot, bringing the mixture to a boil.

    5️⃣ Simmer with Vegetables: Once boiling, reduce the heat to low and add the chopped bell peppers and sliced carrots. Cover and let simmer for about 1.5 to 2 hours, stirring occasionally until the beef is tender.

    6️⃣ Finalize the Flavor: Taste the goulash and adjust the seasoning with more salt and pepper if necessary.

    7️⃣ Serve: Ladle the goulash into bowls and garnish with fresh parsley.

    Goulash

    💡 Tips & Variations:

    • Adjusting the Thickness: If you prefer a thicker goulash, remove the lid during the last 30 minutes of cooking to let it reduce.
    • Vegetarian Option: Substitute beef with lentils, mushrooms, or other hearty vegetables for a vegetarian version of goulash.
    • Spice it Up: For those who enjoy some heat, add a diced jalapeño or a dash of cayenne pepper to the mix.

    Goulash

    FAQ

    Q1: Can I make goulash ahead of time?
    Yes! Goulash tastes even better the next day as the flavors meld together. Just store it in an airtight container in the refrigerator for up to three days, or you can freeze it for longer storage.

    Q2: What can I serve with goulash?
    Goulash pairs perfectly with crusty bread, buttery egg noodles, or even a side of mashed potatoes to soak up the delicious sauce.

    Q3: Can I use different cuts of beef?
    While beef chuck is ideal for this recipe due to its tenderness after slow cooking, you can use other cuts like brisket or round. Just ensure they have enough marbling for flavor and tenderness.

    Conclusion

    Making goulash at home is surprisingly easy and incredibly rewarding. With its rich and hearty flavors, this dish is sure to become a family favorite. So, why not give it a try? Gather your ingredients, follow the steps, and serve up this comforting stew at your next meal gathering!

    👉 Try it now and share your experience in the comments below! What variations did you choose, and how did your family enjoy this delightful dish?

  • German Roulades

    German Roulades

    German Roulades

    If you’re searching for a hearty and comforting dish that brings the flavors of Germany into your kitchen, look no further than German Roulades. This traditional dish features tender beef rolled around savory fillings, resulting in a meal that’s as delicious as it is satisfying. Perfect for family gatherings or a cozy dinner, let’s dive into how to make this delightful classic!

    German Roulades are more than just a dish; they are a celebration of flavors and culinary tradition. The combination of beef, bacon, onion, and pickle, all slathered in mustard, creates a symphony of taste that is both rich and comforting. As you sink your teeth into these juicy rolls, you’ll be transported to the heart of Germany, where local ingredients and time-honored recipes combine to produce unforgettable meals. Let’s get started on creating this delicious dish right at home!

    Ingredients:

    • 8 slices of beef (flank or round)
    • 4 slices of bacon
    • 1 onion, sliced
    • 1 dill pickle, sliced
    • 2 tablespoons mustard
    • Salt and pepper to taste
    • 2 tablespoons vegetable oil
    • 2 cups beef broth
    • 1 tablespoon flour (optional for thickening)
    • Fresh parsley for garnish

    Directions:

    1️⃣ Prepare the Beef: Start by lightly pounding the beef slices to ensure they are tender and easy to roll. Season both sides with salt and pepper, and spread a thin layer of mustard on each slice.

    2️⃣ Add Fillings: Place a slice of bacon, a few onion slices, and a couple of dill pickle slices in the center of each beef slice.

    3️⃣ Roll and Secure: Roll each slice tightly around the fillings, securing them with toothpicks or kitchen twine to keep everything in place during cooking.

    4️⃣ Brown the Roulades: In a large skillet, heat 2 tablespoons of vegetable oil over medium-high heat. Add the beef roulades and brown them on all sides for about 5-7 minutes.

    5️⃣ Simmer: Once browned, carefully add 2 cups of beef broth to the skillet. Bring it to a gentle simmer, cover the skillet, and let the roulades cook for about 1 to 1.5 hours, or until the beef is tender.

    6️⃣ Optional Thickening: If you prefer a thicker sauce, you can mix 1 tablespoon of flour with a bit of cold water and stir it into the broth during the last 10 minutes of cooking.

    7️⃣ Serve: Remove the roulades from the skillet and let them rest for a few minutes before slicing. Garnish with fresh parsley and serve with your favorite sides such as potatoes or a fresh salad.

    German Roulades

    Tips & Variations:

    • Meat Alternatives: You can use pork or turkey as a substitute for beef, offering a unique twist on this traditional dish.
    • Vegetable Additions: For extra flavor, feel free to add carrots or bell peppers to the filling. They can provide a nice sweetness and texture contrast.
    • Cooking Methods: If you’re short on time, consider using a pressure cooker for quicker results. The flavors will meld beautifully in this method too.
    • Sauce Variations: Add a splash of red wine or cream to the broth for a richer sauce.

    German Roulades

    FAQ

    1. Can I make German Roulades ahead of time?
    Yes! You can prepare the roulades, brown them, and simmer them ahead of time. Just reheat before serving for a quick meal.

    2. What sides do you recommend serving with Roulades?
    Traditional sides include potato dumplings, spaetzle, or simply boiled potatoes. A side of steamed vegetables also pairs nicely!

    3. Can I freeze leftover Roulades?
    Absolutely! Let them cool completely, then store them in an airtight container in the freezer. They will last for about 3 months.

    4. How do I prevent the roulades from unrolling during cooking?
    Ensuring you secure them tightly with toothpicks or twine is key. Browning them well can also help to keep the filling intact.

    Conclusion

    Now that you’ve learned how to make delicious German Roulades, it’s time to bring a taste of Germany to your table! This dish is sure to impress your family and friends, making any meal a special occasion. Gather your ingredients and start cooking today.

    👉 Try it now and share your experience with us! We’d love to hear how your roulades turned out!

  • German Fried Potatoes

    German Fried Potatoes

    German Fried Potatoes

    German Fried Potatoes, also known as "Bratkartoffeln," are a hearty and flavorful dish that boasts the perfect combination of crispy texture and savory taste. This iconic side dish is not only a staple in German cuisine but also a beloved favorite around the world. If you’re looking to add a delicious twist to your meals, German Fried Potatoes are a fantastic option that pairs well with various main courses.

    Discover the Deliciousness of German Fried Potatoes

    If you’re a fan of comforting, soul-warming dishes, then prepare your taste buds for a delight! This recipe for German Fried Potatoes will transport you straight to a cozy German kitchen, where the scent of sizzling bacon and crispy potatoes fills the air. Not only is this dish simple to make, but it also elevates any meal with its rich flavors and delightful crunch.

    🧂 Ingredients:

    • 4 large potatoes, peeled and sliced
    • 4 slices of bacon, chopped
    • 1 onion, diced
    • Salt to taste
    • Pepper to taste
    • Fresh parsley for garnish (optional)

    👩‍🍳 Directions:
    1️⃣ Prepare the Potatoes: Start by washing and peeling the potatoes. Slice them into thin, even pieces to ensure they cook uniformly. Rinse the sliced potatoes in cold water and pat them dry with a kitchen towel to remove excess moisture.

    2️⃣ Cook the Bacon: In a large skillet, fry the chopped bacon over medium heat until it becomes crispy. This will add a delicious flavor to your potatoes later. Once done, remove the bacon from the skillet and set it aside, leaving the rendered fat in the pan.

    3️⃣ Sauté the Onions: In the same skillet with the bacon fat, add the diced onions. Sauté them until they are translucent and slightly golden, which should take about 3-5 minutes. This will add a lovely sweetness to the dish.

    4️⃣ Fry the Potatoes: Add the sliced potatoes to the skillet, spreading them out evenly. Season with salt and pepper to taste. Allow them to cook undisturbed for about 5-7 minutes until the bottom side is golden brown.

    5️⃣ Flip & Stir: Carefully flip the potatoes (you might want to use a spatula or tongs). Continue to cook for another 5-7 minutes until the second side is crispy and golden. You may need to stir occasionally to ensure they cook evenly.

    6️⃣ Combine Ingredients: Once the potatoes are cooked to your liking, add the crispy bacon back into the skillet. Mix gently until everything is well combined.

    7️⃣ Garnish & Serve: Sprinkle fresh parsley before serving for a pop of color and added flavor. Enjoy your German Fried Potatoes hot!

    German Fried Potatoes

    💡 Tips & Variations:

    • For an extra crispy texture, you can parboil the potatoes before slicing and frying them. This helps create a fluffy interior while still achieving that crispy exterior.
    • Feel free to experiment with different herbs and spices. Adding some thyme or paprika can elevate the flavor profile of your dish.
    • Try adding bell peppers or mushrooms to the mix for an added layer of flavor and nutrition.
    • If you want a vegetarian version, you can substitute bacon with smoked tofu or a plant-based bacon alternative.

    German Fried Potatoes

    FAQ

    1. Can I use any type of potatoes for this recipe?
    Yes, while starchy potatoes like Russets or Yukon Gold work best for achieving that crispy texture, you can use other types too.

    2. How should I store leftover German Fried Potatoes?
    Store leftovers in an airtight container in the fridge for up to 3 days. To reheat, pan-fry them again to regain their crispiness.

    3. Can I make this dish in advance?
    German Fried Potatoes are best enjoyed fresh, but you can prepare the potatoes and onions ahead of time. Just fry them just before serving.

    4. What can I serve with German Fried Potatoes?
    These delicious potatoes pair perfectly with grilled meats, sausages, or even a fresh salad for a lighter meal.

    👉 Try it now: Now that you have this easy recipe for German Fried Potatoes, why not bring a taste of Germany into your kitchen? Prepare this delicious dish for your next family meal, and don’t forget to share your experience! We’d love to hear how your German Fried Potatoes turned out!

  • Hunter’s Schnitzel

    Hunter’s Schnitzel

    Hunter’s Schnitzel

    When you think of comfort food, few dishes can compete with the warmth and deliciousness of a perfectly cooked schnitzel. One variation that stands out is Hunter’s Schnitzel, a delightful dish that elevates the classic schnitzel with the savory addition of mushrooms and creamy sauce. This article will guide you through the steps of preparing Hunter’s Schnitzel, along with some tips to make your cooking experience even better!

    What is Hunter’s Schnitzel?

    Hunter’s Schnitzel, or Jagdwurst, originates from traditional German and Austrian cuisines. This dish typically features tender schnitzel topped with mushrooms and a rich creamy sauce, making it an irresistible meal for any occasion. Perfect for weeknight dinners or gatherings, this recipe is sure to impress your guests while satisfying your own cravings.

    🧂 Ingredients:

    • Boneless pork cutlets: 4
    • Flour: 1⁄2 cup (60 g)
    • Egg: 1, beaten
    • Breadcrumbs: 1 cup (100 g)
    • Mushrooms: 1 cup (100 g), sliced
    • Butter: 2 tbsp (30 g)
    • Cream: 1⁄2 cup (120 ml)
    • Onion: 1 small, diced
    • Salt and pepper to taste

    👩‍🍳 Directions:
    1️⃣ Prepare the schnitzel: Start by tenderizing the boneless pork cutlets using a meat mallet. Aim for a uniform thickness of about 1/4 inch. Season both sides with salt and pepper.

    2️⃣ Bread the schnitzel: Set up a breading station with three shallow dishes. In the first dish, add the flour. In the second, pour the beaten egg. In the third, place the breadcrumbs. Dredge each cutlet in flour, dip it into the beaten egg, then coat it with breadcrumbs. Make sure to press the breadcrumbs onto the meat for a better crust.

    3️⃣ Fry the schnitzel: In a large skillet, heat oil over medium heat. Add the breaded schnitzels, cooking until golden brown on both sides (about 3-4 minutes per side). Transfer the cooked schnitzels to a paper towel-lined plate to drain excess oil.

    4️⃣ Prepare the sauce: In the same skillet, melt the butter over medium heat. Add the diced onion and sliced mushrooms, sautéing until the mushrooms are soft and golden. Pour in the cream and stir everything together, letting it simmer for a few minutes. Season with salt and pepper to taste.

    5️⃣ Assemble the dish: Serve the schnitzels hot, topped with the creamy mushroom sauce. Garnish with fresh herbs, if desired.

    Hunter's Schnitzel

    💡 Tips & Variations:

    • Meat options: While pork is traditional, you can also use chicken or turkey cutlets for a leaner variation.
    • Vegan alternative: For a vegan option, consider using plant-based breaded cutlets and a cream alternative made from cashews or soy.
    • Add herbs: Enhance the flavor of your creamy sauce by incorporating fresh herbs like parsley or thyme.
    • Side dishes: Pair Hunter’s Schnitzel with mashed potatoes, spaetzle, or a fresh green salad for a well-rounded meal.

    Hunter's Schnitzel

    FAQ

    Q: Can I make Hunter’s Schnitzel in advance?
    A: Yes! You can bread and fry the schnitzels ahead of time and store them in the refrigerator. Just reheat in the oven before serving, and prepare the mushroom sauce fresh.

    Q: What type of mushrooms work best?
    A: Traditional options include button or cremini mushrooms, but feel free to experiment with different varieties for a unique flavor profile.

    Q: Can I freeze the leftovers?
    A: Yes, you can freeze the schnitzels and mushroom sauce separately. Thaw in the refrigerator and reheat gently when ready to serve.

    Q: How do I know when the schnitzel is cooked through?
    A: The schnitzel should be golden brown and reach an internal temperature of at least 145°F (63°C). You can check using a meat thermometer.

    👉 Try it now! Experience the mouthwatering flavors of Hunter’s Schnitzel and treat yourself and your loved ones to this heavenly dish. Share your experience in the comments below or tag us in your culinary creations! Happy cooking!

  • German Potato Soup

    German Potato Soup

    German Potato Soup

    When the weather turns chilly and you’re craving something warm and comforting, there’s nothing quite like a hearty bowl of German Potato Soup. This creamy, flavorful dish combines the earthiness of potatoes with the savory notes of smoked sausage, making it a perfect meal for cold evenings. In this article, you’ll discover the classic recipe for this delightful soup, along with some tips and variations to make it your own!

    A Hearty Comfort Food

    German Potato Soup, or "Kartoffelsuppe," is a staple in many German households. It’s not only filling but also incredibly easy to prepare. Whether you’re serving it as a main dish for your family or as a starter at a dinner party, this soup is sure to impress. Let’s dive into the ingredients and the simple steps to create this delicious dish.

    🧂 Ingredients:

    • 4 medium potatoes, peeled and diced
    • 2 carrots, diced
    • 1 onion, chopped
    • 2 cloves garlic, minced
    • 1 smoked sausage, sliced
    • 4 cups vegetable or chicken broth
    • 1 cup heavy cream
    • 2 tablespoons olive oil
    • Salt and pepper to taste
    • Fresh herbs (such as parsley or thyme) for garnish

    👩‍🍳 Directions:
    1️⃣ Prepare the Vegetables: Begin by heating the olive oil in a large pot over medium heat. Add the chopped onion and minced garlic, sautéing until the onion becomes translucent—about 3 to 4 minutes.

    2️⃣ Add the Carrots and Potatoes: Throw in the diced carrots and potatoes, stirring them with the onion and garlic for another 5 minutes.

    3️⃣ Incorporate the Sausage: Add the sliced smoked sausage to the pot, allowing it to brown lightly before moving on to the next step.

    4️⃣ Pour in the Broth: Add the vegetable or chicken broth and bring the mixture to a boil. Once boiling, reduce the heat and let it simmer for about 20 minutes, or until the potatoes and carrots are soft.

    5️⃣ Blend the Soup (Optional): For a creamy texture, you can use an immersion blender to puree part of the soup, or you can transfer a portion to a traditional blender. Make sure to leave some chunks for added texture.

    6️⃣ Add the Cream: Stir in the heavy cream and season with salt and pepper to taste. Let the soup simmer for an additional 5 minutes to heat through.

    7️⃣ Serve: Ladle the soup into bowls and garnish with fresh herbs like parsley or thyme.

    German Potato Soup

    💡 Tips & Variations:

    • Vegetarian Option: Replace the smoked sausage with mushrooms or tofu for a vegetarian version.
    • Spicy Kick: Add a pinch of red pepper flakes or some chopped jalapeños for a spicy twist.
    • Storage: Leftover soup can be stored in an airtight container in the refrigerator for up to 3 days or frozen for up to 3 months.
    • Serving Suggestion: Serve with crusty bread or a side salad for a complete meal.

    German Potato Soup

    Frequently Asked Questions (FAQ)

    Q1: Can I use other types of potatoes?
    Yes! While Yukon Gold or Russet potatoes work beautifully, you can also experiment with red potatoes for a different texture.

    Q2: How can I make this soup thicker?
    To thicken the soup, you can blend in more potatoes, or add a cornstarch slurry (mix 1 tablespoon of cornstarch with 2 tablespoons of water) after the cream and allow it to simmer until thickened.

    Q3: What’s the best way to store leftovers?
    Store leftovers in an airtight container in the fridge for up to 3 days. You can also freeze the soup, though keep in mind the cream may separate upon reheating.

    Q4: Can I make this soup ahead of time?
    Absolutely! In fact, the flavors often deepen and improve when the soup is stored and reheated the next day.

    👉 Try it now! With this delicious and hearty German Potato Soup recipe, you can warm up your kitchen and your heart. Share your experiences and variations in the comments below—I’d love to hear how your version turned out! Enjoy every spoonful of this comforting classic.

  • German Potato Pancakes

    German Potato Pancakes

    German Potato Pancakes

    When it comes to comfort food, few dishes evoke a sense of home quite like German potato pancakes, also known as Kartoffelpuffer. These crispy, golden-brown delights are deliciously savory with a hint of sweetness, especially when paired with applesauce. Whether you’re hosting a festive gathering or looking for a simple weekday treat, this recipe is sure to impress! Let’s dive into how you can make these delightful pancakes right in your kitchen.

    A Taste of Tradition

    German potato pancakes are more than just a dish; they represent a rich cultural heritage. Traditionally, they are enjoyed during festive occasions and are often accompanied by apple sauce or sour cream. With a few easy-to-find ingredients and straightforward steps, you can create this classic recipe that captures the essence of German cuisine.

    🧂 Ingredients:

    • 4 large potatoes, peeled
    • 1 onion, grated
    • 1 egg
    • 1/4 cup all-purpose flour
    • Salt and pepper to taste
    • Oil for frying
    • Applesauce for serving

    👩‍🍳 Directions:
    1️⃣ Begin by grating the peeled potatoes into a large mixing bowl. If you prefer a smoother texture, you can use a food processor.
    2️⃣ Next, add the grated onion into the bowl with the potatoes. This will enhance the flavor and add moisture to the mixture.
    3️⃣ Crack the egg into the bowl and beat it lightly before mixing it with the potato and onion.
    4️⃣ Gradually fold in the all-purpose flour, ensuring that all ingredients are well combined. Season the mixture with salt and pepper to your liking.
    5️⃣ Heat a generous amount of oil in a skillet over medium heat. You’ll want enough oil to cover the bottom of the pan for optimal crispiness.
    6️⃣ Once the oil is hot, scoop about a quarter cup of the potato mixture into the skillet, flattening it slightly to form a pancake.
    7️⃣ Fry each pancake for about 3-4 minutes on each side or until they achieve a golden-brown color.
    8️⃣ Transfer the pancakes onto a plate lined with paper towels to absorb any excess oil.
    9️⃣ Repeat the process until all the mixture is used up, adding more oil as needed.

    German Potato Pancakes

    💡 Tips & Variations:

    • For extra crispy pancakes, squeeze out any excess moisture from the grated potatoes before mixing in the other ingredients.
    • You can add a pinch of garlic powder or herbs like chives for additional flavor.
    • If you’re looking for a healthier option, try baking the pancakes in the oven at 400°F (200°C) on a greased baking sheet for about 20 minutes, flipping halfway through.
    • Consider serving with sour cream or a dollop of Greek yogurt alongside the applesauce for a creamier taste.

    German Potato Pancakes

    Frequently Asked Questions

    Q: Can I make the potato pancake mixture ahead of time?
    A: Yes, you can prepare the potato mixture and store it in the refrigerator for up to 24 hours before cooking. Just remember to stir it well before frying to ensure all ingredients are combined.

    Q: What type of potatoes work best?
    A: Starchy potatoes like Russets or Idaho potatoes are ideal for achieving that perfect crispy texture. Waxy potatoes may end up too mushy.

    Q: Can I freeze leftover potato pancakes?
    A: Absolutely! Cooked potato pancakes can be frozen in single layers on a baking sheet. Once frozen, transfer them to a sealable plastic bag. When you’re ready to eat, just reheat them in the oven or a skillet.

    Q: Can I use other vegetables?
    A: Yes! Feel free to experiment by adding grated carrots, zucchini, or even cheese to the mixture for unique flavors.

    👉 Ready to make your very own German potato pancakes? Try it now and bring a taste of tradition to your table! We’d love to hear about your experience in the comments below!

  • Classic Hunter’s Schnitzel

    Classic Hunter’s Schnitzel

    Classic Hunter’s Schnitzel

    When it comes to classic comfort foods, few dishes can rival the savory and succulent flavor of Classic Hunter’s Schnitzel. Originating from Germany, this dish combines the textures of tender pork cutlets with a rich, flavorful sauce that is sure to delight your taste buds. Perfect for family dinners or special occasions, Hunter’s Schnitzel is a crowd-pleaser that’s both easy to make and incredibly satisfying.

    A Taste of Tradition

    Hunter’s Schnitzel, or "Jägerschnitzel," offers a delightful twist on the traditional schnitzel. This variation is accompanied by a luxurious mushroom and onion gravy, making it hearty and robust. If you have a craving for something delicious and filling, then this dish should be at the top of your list!

    🧂 Ingredients:

    • 4 pork loin cutlets
    • 1 cup all-purpose flour
    • 2 eggs
    • 1 cup breadcrumbs
    • Salt and pepper to taste
    • 2 tablespoons vegetable oil
    • 2 tablespoons butter
    • 1 onion, chopped
    • 8 ounces mushrooms, sliced
    • 1 cup beef broth
    • 1 tablespoon Worcestershire sauce
    • 1 tablespoon heavy cream
    • Parsley for garnish

    👩‍🍳 Directions:

    1. Start by flattening the pork loin cutlets to about 1/4 inch thick. This ensures they cook evenly and remain tender.
    2. Season the flour with salt and pepper in a shallow dish. In another bowl, beat the eggs. Place the breadcrumbs in a third dish.
    3. Dip each cutlet first into the seasoned flour, shaking off any excess. Then, coat it in the egg mixture, followed by the breadcrumbs until fully covered.
    4. In a large skillet, heat the vegetable oil and 1 tablespoon of butter over medium heat. Once hot, add the breaded cutlets and cook until golden brown on both sides (about 4-5 minutes per side). Remove from the skillet and set aside.
    5. In the same skillet, melt the remaining butter and add the chopped onion and sliced mushrooms. Sauté until they become soft and lightly browned.
    6. Pour in the beef broth and Worcestershire sauce, stirring to combine. Allow the sauce to simmer for a few minutes.
    7. Stir in the heavy cream, cooking for an additional 2-3 minutes until the sauce thickens slightly.
    8. Return the cooked schnitzel to the skillet, allowing it to simmer in the sauce for a couple of minutes to absorb the flavors.
    9. Serve hot, garnished with fresh parsley.

    Classic Hunter's Schnitzel

    💡 Tips & Variations:

    • For a crispier schnitzel, double-dip the cutlets by repeating the coating process in the eggs and breadcrumbs.
    • You can also substitute pork with chicken or veal for a different flavor profile.
    • Add a splash of white wine to the sauce for an extra layer of richness.
    • Serve with a side of buttered noodles or a fresh green salad to complement the dish.

    Classic Hunter's Schnitzel

    FAQ

    Q: Can I make Hunter’s Schnitzel ahead of time?
    A: Yes! You can prepare the cutlets and even the sauce ahead of time. Simply reheat gently before serving.

    Q: What can I use instead of beef broth?
    A: Chicken or vegetable broth can be used as an alternative if you prefer a lighter flavor.

    Q: Can I freeze Hunter’s Schnitzel?
    A: While it’s best served fresh, you can freeze the cooked schnitzel and sauce in an airtight container. Thaw and reheat before serving.

    Q: What wine pairs well with Hunter’s Schnitzel?
    A: A light-bodied red wine, like Pinot Noir, complements the flavors beautifully.

    👉 Try it now!
    Experience the mouthwatering flavors of Classic Hunter’s Schnitzel in your kitchen today. Don’t forget to share your cooking experience with us in the comments below! Enjoy!

  • Best Ever Beef Stew

    Best Ever Beef Stew

    Best Ever Beef Stew

    There’s something about the smell of beef stew simmering on the stove that just hits different—like a warm hug on a cold day. I remember the first time I tried making it. Let’s just say, the smoke alarm went off more than once. But trust me, once you nail this down, you’ll be coming back for seconds—maybe even thirds! This recipe is the ultimate comfort food, perfect for a fast dinner that feels like it took all day.

    Why This Recipe Works

    This beef stew is a winner, and here’s why:

    1. Tender meat every time: We’ll be browning the beef, then simmering it to perfection. This makes sure it’s melt-in-your-mouth tender.

    2. Simple and straightforward: With just a few ingredients and steps, you can whip this up without any culinary expertise. If I can do it, so can you!

    3. Save money: Using affordable cuts of beef, plus those pantry staples, means you’re feeding the whole family without breaking the bank.

    Fun fact: Browning the meat before simmering it helps develop richer flavors thanks to the Maillard reaction. It’s a fancy term for the way protein reacts to heat, but it basically makes everything taste better. You’re welcome!

    The Walkthrough

    Let’s get cooking! Grab your ingredients and let’s dive in.

    1. Coat the beef: Toss 2 pounds of stew meat into a large bowl. Sprinkle with 1/2 cup of flour and 1 tablespoon of seasoning salt. Give it a good mix so every piece is covered. It’s going to look like a floury mess, but that’s okay!

    2. Heat things up: Grab a large pot. Heat 2 tablespoons of olive oil over medium heat. You want it hot but not smoking.

    3. Brown the beef: Carefully place the floured meat in the pot, making sure not to overcrowd it. Brown it for about 5 to 7 minutes on all sides. Don’t panic if it sticks a little; just give it time.

    4. Add the magic liquid: Once browned, throw in enough water or beef broth to cover the stew meat. Bring this puppy to a boil.

    5. Slow and steady: When it’s bubbling away, reduce the heat to let it simmer. Cover your pot and let it cook for 1.5 to 2 hours. Seriously, the longer it simmers, the more tender and flavorful it gets. Give it a stir every now and then.

    6. Serve hot: When it’s ready, dish out the stew into bowls. Maybe add some crusty bread on the side if you’re feeling fancy!

    Best Ever Beef Stew

    Troubleshooting & Secrets

    Here are a couple of places I messed up before so you don’t have to:

    • Too much flour: I once coated the beef too liberally, and it ended up a gloppy mess. You want a light dusting, just enough to coat—no need for a full flour rainstorm.

    • Not sealing in the flavor: If you skip the browning step, you might miss out on that rich flavor. So take the time; it’s worth it!

    • Substitutions? You can definitely use salted butter if you forget to buy olive oil, but just taste as you go to avoid it being too salty.

    Storage & Leftovers

    This stew is good for about 3 days in the fridge, but I’d recommend eating it up front. After that, the beef tends to get a little soggy, and no one wants that!

    Quick Glance Recap

    Ingredients:

    • 2 pounds beef stew meat
    • 1/2 cup all-purpose flour
    • 1 tablespoon seasoning salt
    • 2 tablespoons olive oil
    • Water or beef broth (to cover)

    Steps:

    1. Coat beef with flour and seasoning salt.
    2. Heat olive oil in a pot.
    3. Brown beef for 5-7 minutes.
    4. Add water/broth to cover and boil.
    5. Reduce heat and simmer for 1.5 to 2 hours.
    6. Serve hot.

    That’s it! Feel free to adapt this recipe as you see fit, and happy cooking!