Blog

  • Chocolate Rice Krispie Balls

    Chocolate Rice Krispie Balls

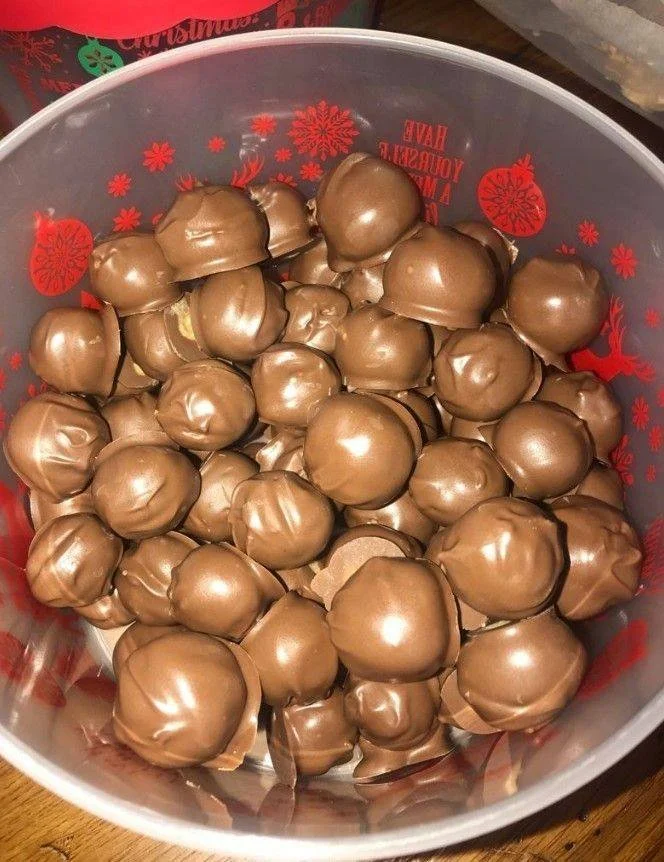
    Chocolate Rice Krispie Balls: A Sweet Treat Made Easy

    Let’s be real for a second—sometimes making a dessert feels like climbing a mountain, right? I once tried creating a fancy cake for a potluck and ended up with a kitchen disaster that resembled a kitchen explosion. Luckily, I stumbled upon this Chocolate Rice Krispie Balls recipe, and trust me, it’s totally foolproof. If you’re looking for a quick, satisfying snack that will have you covered for any last-minute sweet cravings, you’re in the right place!

    Why This Recipe Works

    • Speed: You can whip these up in no time—seriously, I’m talking about 30 minutes max.
    • Simplicity: Only six ingredients are needed. Simple is key, especially when sugar cravings hit!
    • Child-Approved: Even picky eaters love these little balls of goodness, making them perfect for kids and adults alike.

    The magic behind this recipe? The peanut butter gives the Rice Krispies that delightful chewiness while also making them stick together. And then you coat everything in chocolate, which just makes it downright irresistible. It’s simple, satisfying, and a little bit messy (but in a fun way).

    The Walkthrough

    Alright, grab your apron! Here’s the simple process that’ll have you feeling like a pro.

    1. Mix It Up: In a bowl, toss together 1/2 cup of peanut butter, 3 tablespoons of soft butter, and 1 teaspoon of vanilla. Stir until well combined. It’ll look a bit thick and sticky, and that’s perfect. Don’t panic if it looks funky at first.

    2. Get Crunchy: Slowly add Rice Krispies cereal to the peanut butter mix. You want to fold the cereal into the mixture until each piece is well coated. Use more or less Rice Krispies depending on how much texture you want. My trick? Keep adding until it feels just right.

    3. Roll It Up: Grab some of that mixture, and form it into small balls (about the size of a golf ball). Place each one on a baking sheet—don’t worry about spacing them out too much, they won’t spread.

    4. Choc it Up: Melt your choice of chocolate (I love using a combo of semi-sweet and milk chocolate for that perfect balance). Dip each Rice Krispie ball into the melted chocolate until they’re fully coated, then plop them back on the baking sheet.

    5. Setting Time: Allow them to set before munching. If you want them to solidify faster, pop them in the fridge for a bit.

    Troubleshooting & Secrets

    Here’s where I often mess up: not letting the chocolate melt properly. If it’s too thick, it won’t coat well. Be patient and stir gently to avoid burning the chocolate.

    Now, what if you realize you’re out of soft butter? Sure, you can use salted butter instead, but keep in mind it can affect the overall sweetness. Just reduce the salt in the recipe a tad if you go that route.

    Got leftover Rice Krispies? Throw them in some milk as a snack for later or mix ’em into a morning yogurt for a little crunch!

    Storage & Leftovers

    These little treats are good for about 3 days stored in an airtight container at room temperature, but they can start to get a bit soggy after that. If you’re like me and can’t resist eating them all in one sitting, then no worries!

    Quick Glance Recap

    Ingredients:

    • 1/2 cup of peanut butter
    • 3 tablespoons of soft butter
    • 1 teaspoon of vanilla
    • Rice Krispies cereal (about 4 cups)
    • Chocolate for melting (about 8 ounces works well)

    Directions:

    1. Mix peanut butter, butter, and vanilla in a bowl.
    2. Gradually add Rice Krispies until fully coated.
    3. Form into balls and place on a baking sheet.
    4. Melt chocolate and dip each ball into it, then place back on the sheet.
    5. Let set before enjoying.

    Chocolate Rice Krispie Balls

    And that’s it! Whip these bad boys up for your next gathering or just to have a cozy treat on hand. You won’t regret it—I promise!

  • Best Ever Beef Stew

    Best Ever Beef Stew

    Best Ever Beef Stew

    There’s something about the smell of beef stew simmering on the stove that just hits different—like a warm hug on a cold day. I remember the first time I tried making it. Let’s just say, the smoke alarm went off more than once. But trust me, once you nail this down, you’ll be coming back for seconds—maybe even thirds! This recipe is the ultimate comfort food, perfect for a fast dinner that feels like it took all day.

    Why This Recipe Works

    This beef stew is a winner, and here’s why:

    1. Tender meat every time: We’ll be browning the beef, then simmering it to perfection. This makes sure it’s melt-in-your-mouth tender.

    2. Simple and straightforward: With just a few ingredients and steps, you can whip this up without any culinary expertise. If I can do it, so can you!

    3. Save money: Using affordable cuts of beef, plus those pantry staples, means you’re feeding the whole family without breaking the bank.

    Fun fact: Browning the meat before simmering it helps develop richer flavors thanks to the Maillard reaction. It’s a fancy term for the way protein reacts to heat, but it basically makes everything taste better. You’re welcome!

    The Walkthrough

    Let’s get cooking! Grab your ingredients and let’s dive in.

    1. Coat the beef: Toss 2 pounds of stew meat into a large bowl. Sprinkle with 1/2 cup of flour and 1 tablespoon of seasoning salt. Give it a good mix so every piece is covered. It’s going to look like a floury mess, but that’s okay!

    2. Heat things up: Grab a large pot. Heat 2 tablespoons of olive oil over medium heat. You want it hot but not smoking.

    3. Brown the beef: Carefully place the floured meat in the pot, making sure not to overcrowd it. Brown it for about 5 to 7 minutes on all sides. Don’t panic if it sticks a little; just give it time.

    4. Add the magic liquid: Once browned, throw in enough water or beef broth to cover the stew meat. Bring this puppy to a boil.

    5. Slow and steady: When it’s bubbling away, reduce the heat to let it simmer. Cover your pot and let it cook for 1.5 to 2 hours. Seriously, the longer it simmers, the more tender and flavorful it gets. Give it a stir every now and then.

    6. Serve hot: When it’s ready, dish out the stew into bowls. Maybe add some crusty bread on the side if you’re feeling fancy!

    Best Ever Beef Stew

    Troubleshooting & Secrets

    Here are a couple of places I messed up before so you don’t have to:

    • Too much flour: I once coated the beef too liberally, and it ended up a gloppy mess. You want a light dusting, just enough to coat—no need for a full flour rainstorm.

    • Not sealing in the flavor: If you skip the browning step, you might miss out on that rich flavor. So take the time; it’s worth it!

    • Substitutions? You can definitely use salted butter if you forget to buy olive oil, but just taste as you go to avoid it being too salty.

    Storage & Leftovers

    This stew is good for about 3 days in the fridge, but I’d recommend eating it up front. After that, the beef tends to get a little soggy, and no one wants that!

    Quick Glance Recap

    Ingredients:

    • 2 pounds beef stew meat
    • 1/2 cup all-purpose flour
    • 1 tablespoon seasoning salt
    • 2 tablespoons olive oil
    • Water or beef broth (to cover)

    Steps:

    1. Coat beef with flour and seasoning salt.
    2. Heat olive oil in a pot.
    3. Brown beef for 5-7 minutes.
    4. Add water/broth to cover and boil.
    5. Reduce heat and simmer for 1.5 to 2 hours.
    6. Serve hot.

    That’s it! Feel free to adapt this recipe as you see fit, and happy cooking!

  • Hello world!

    Welcome to WordPress. This is your first post. Edit or delete it, then start writing!